Cluster Hardware information
Current control
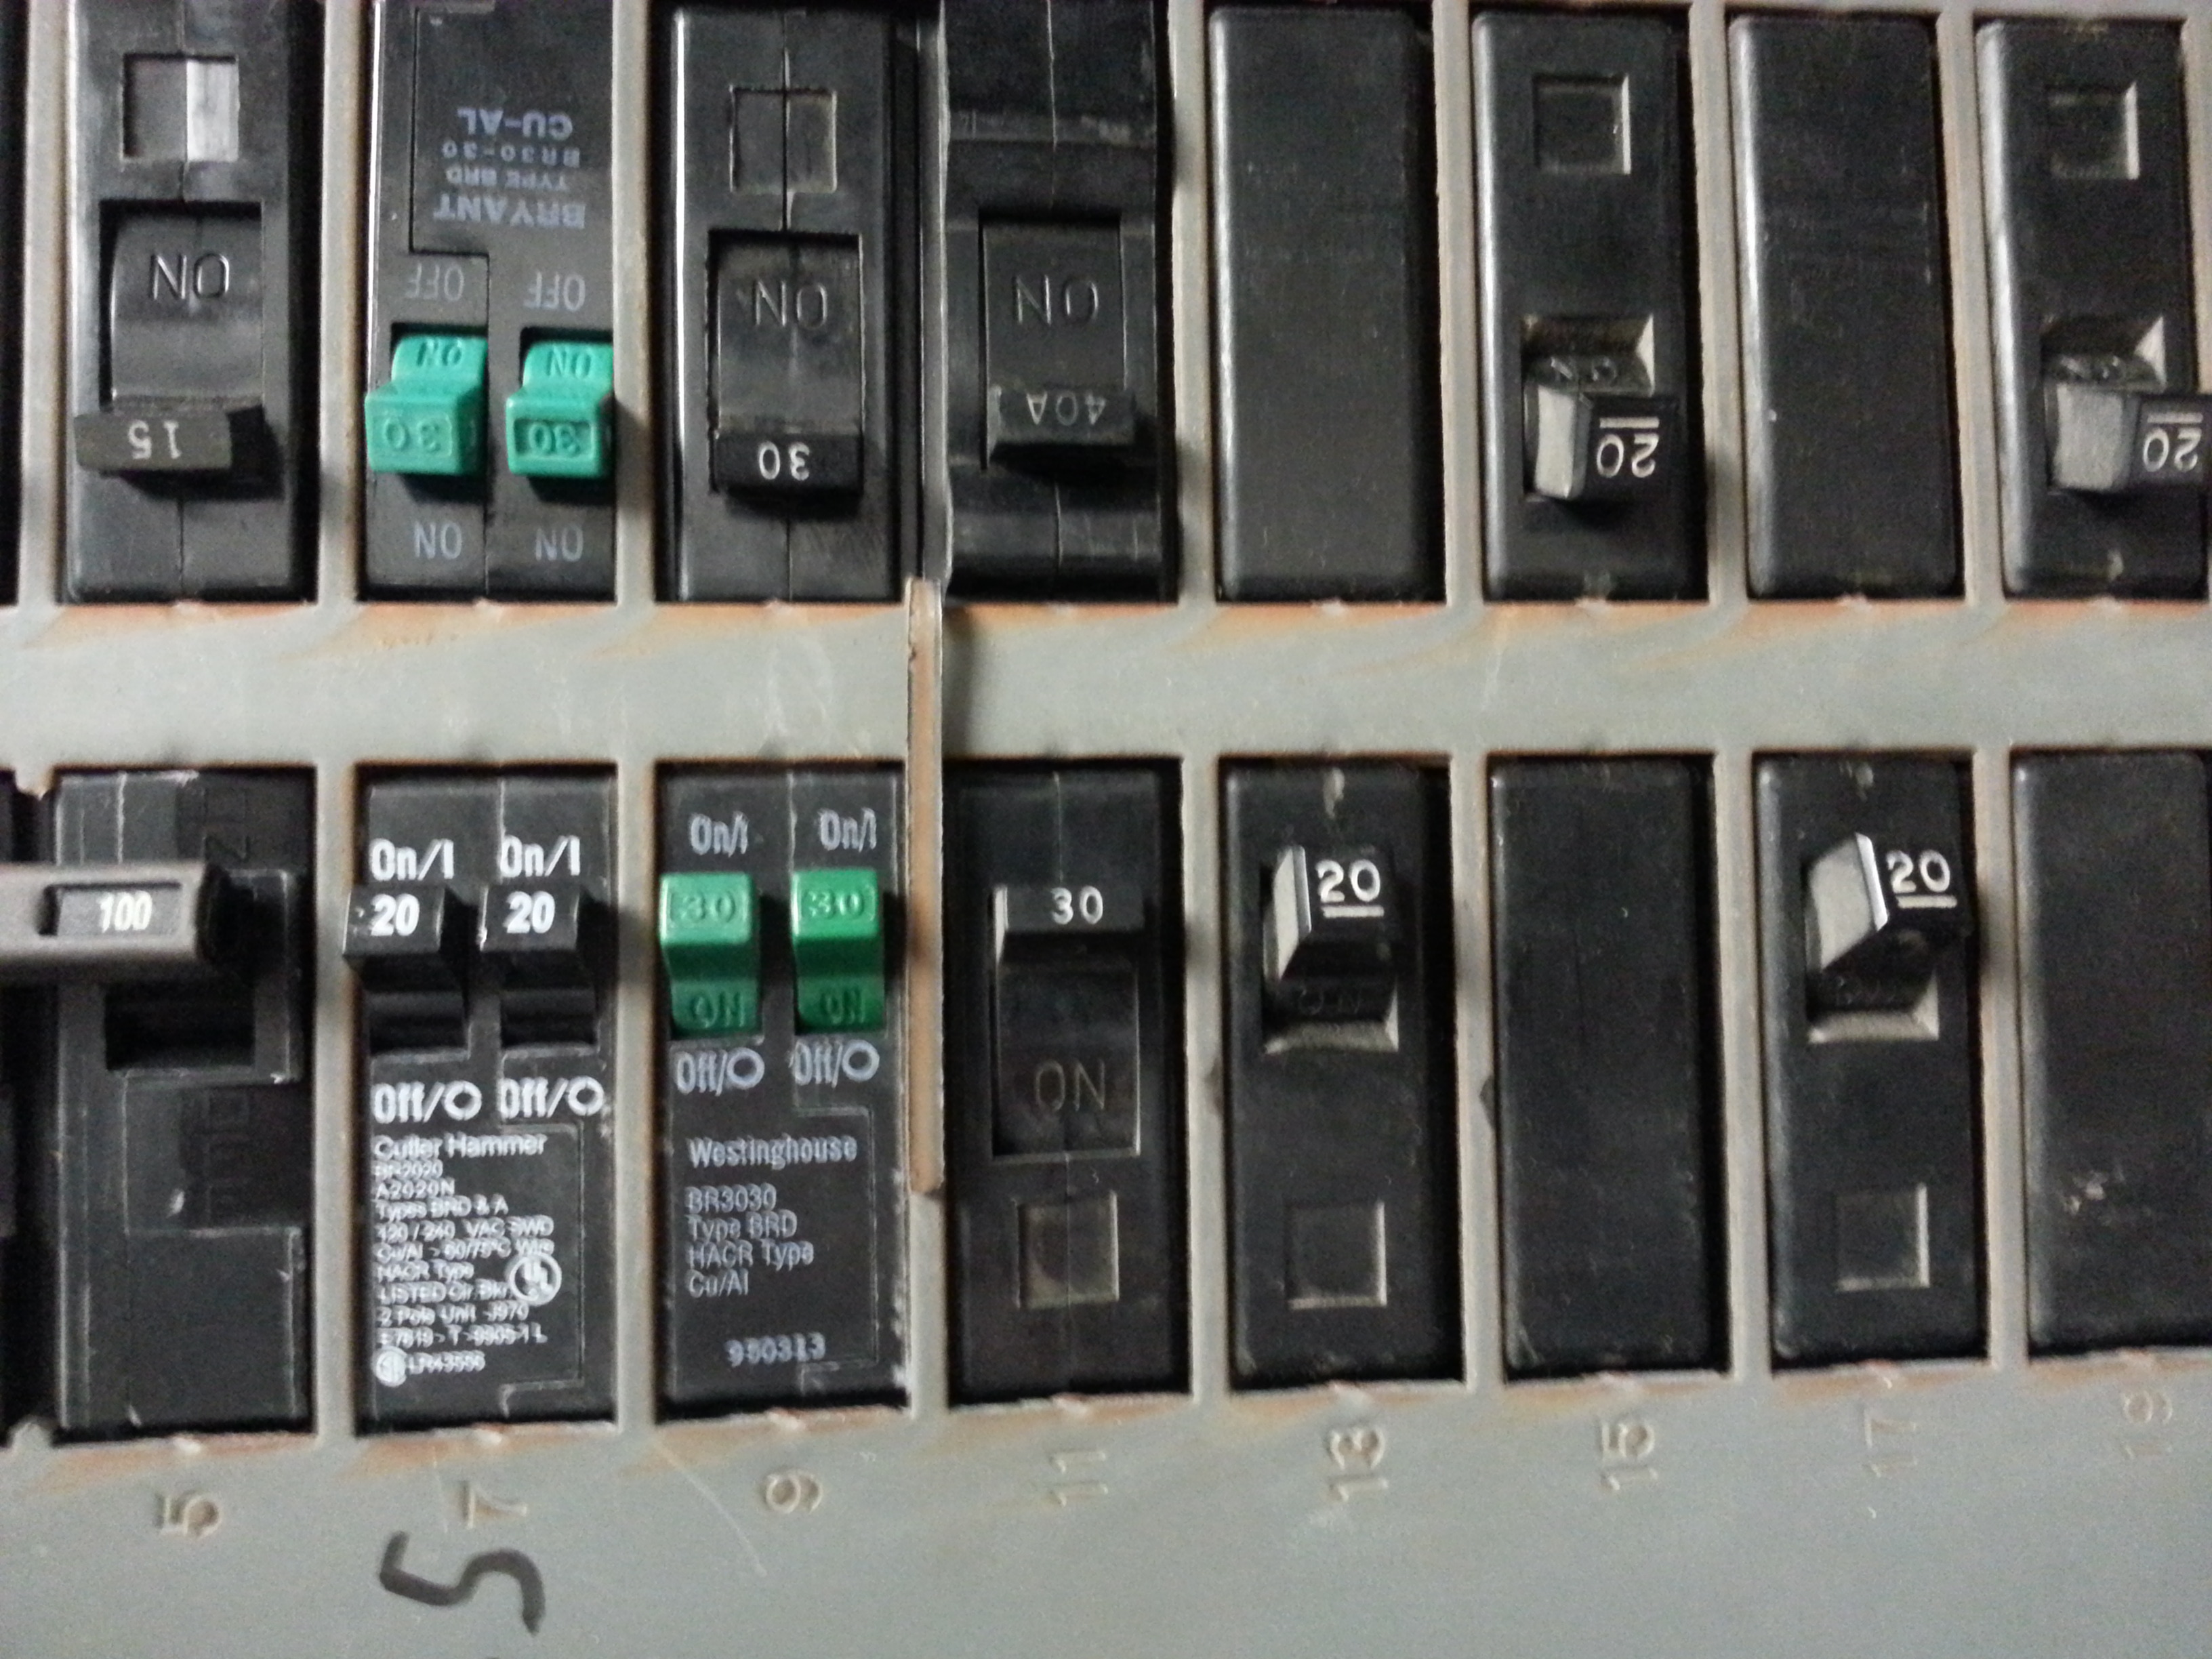
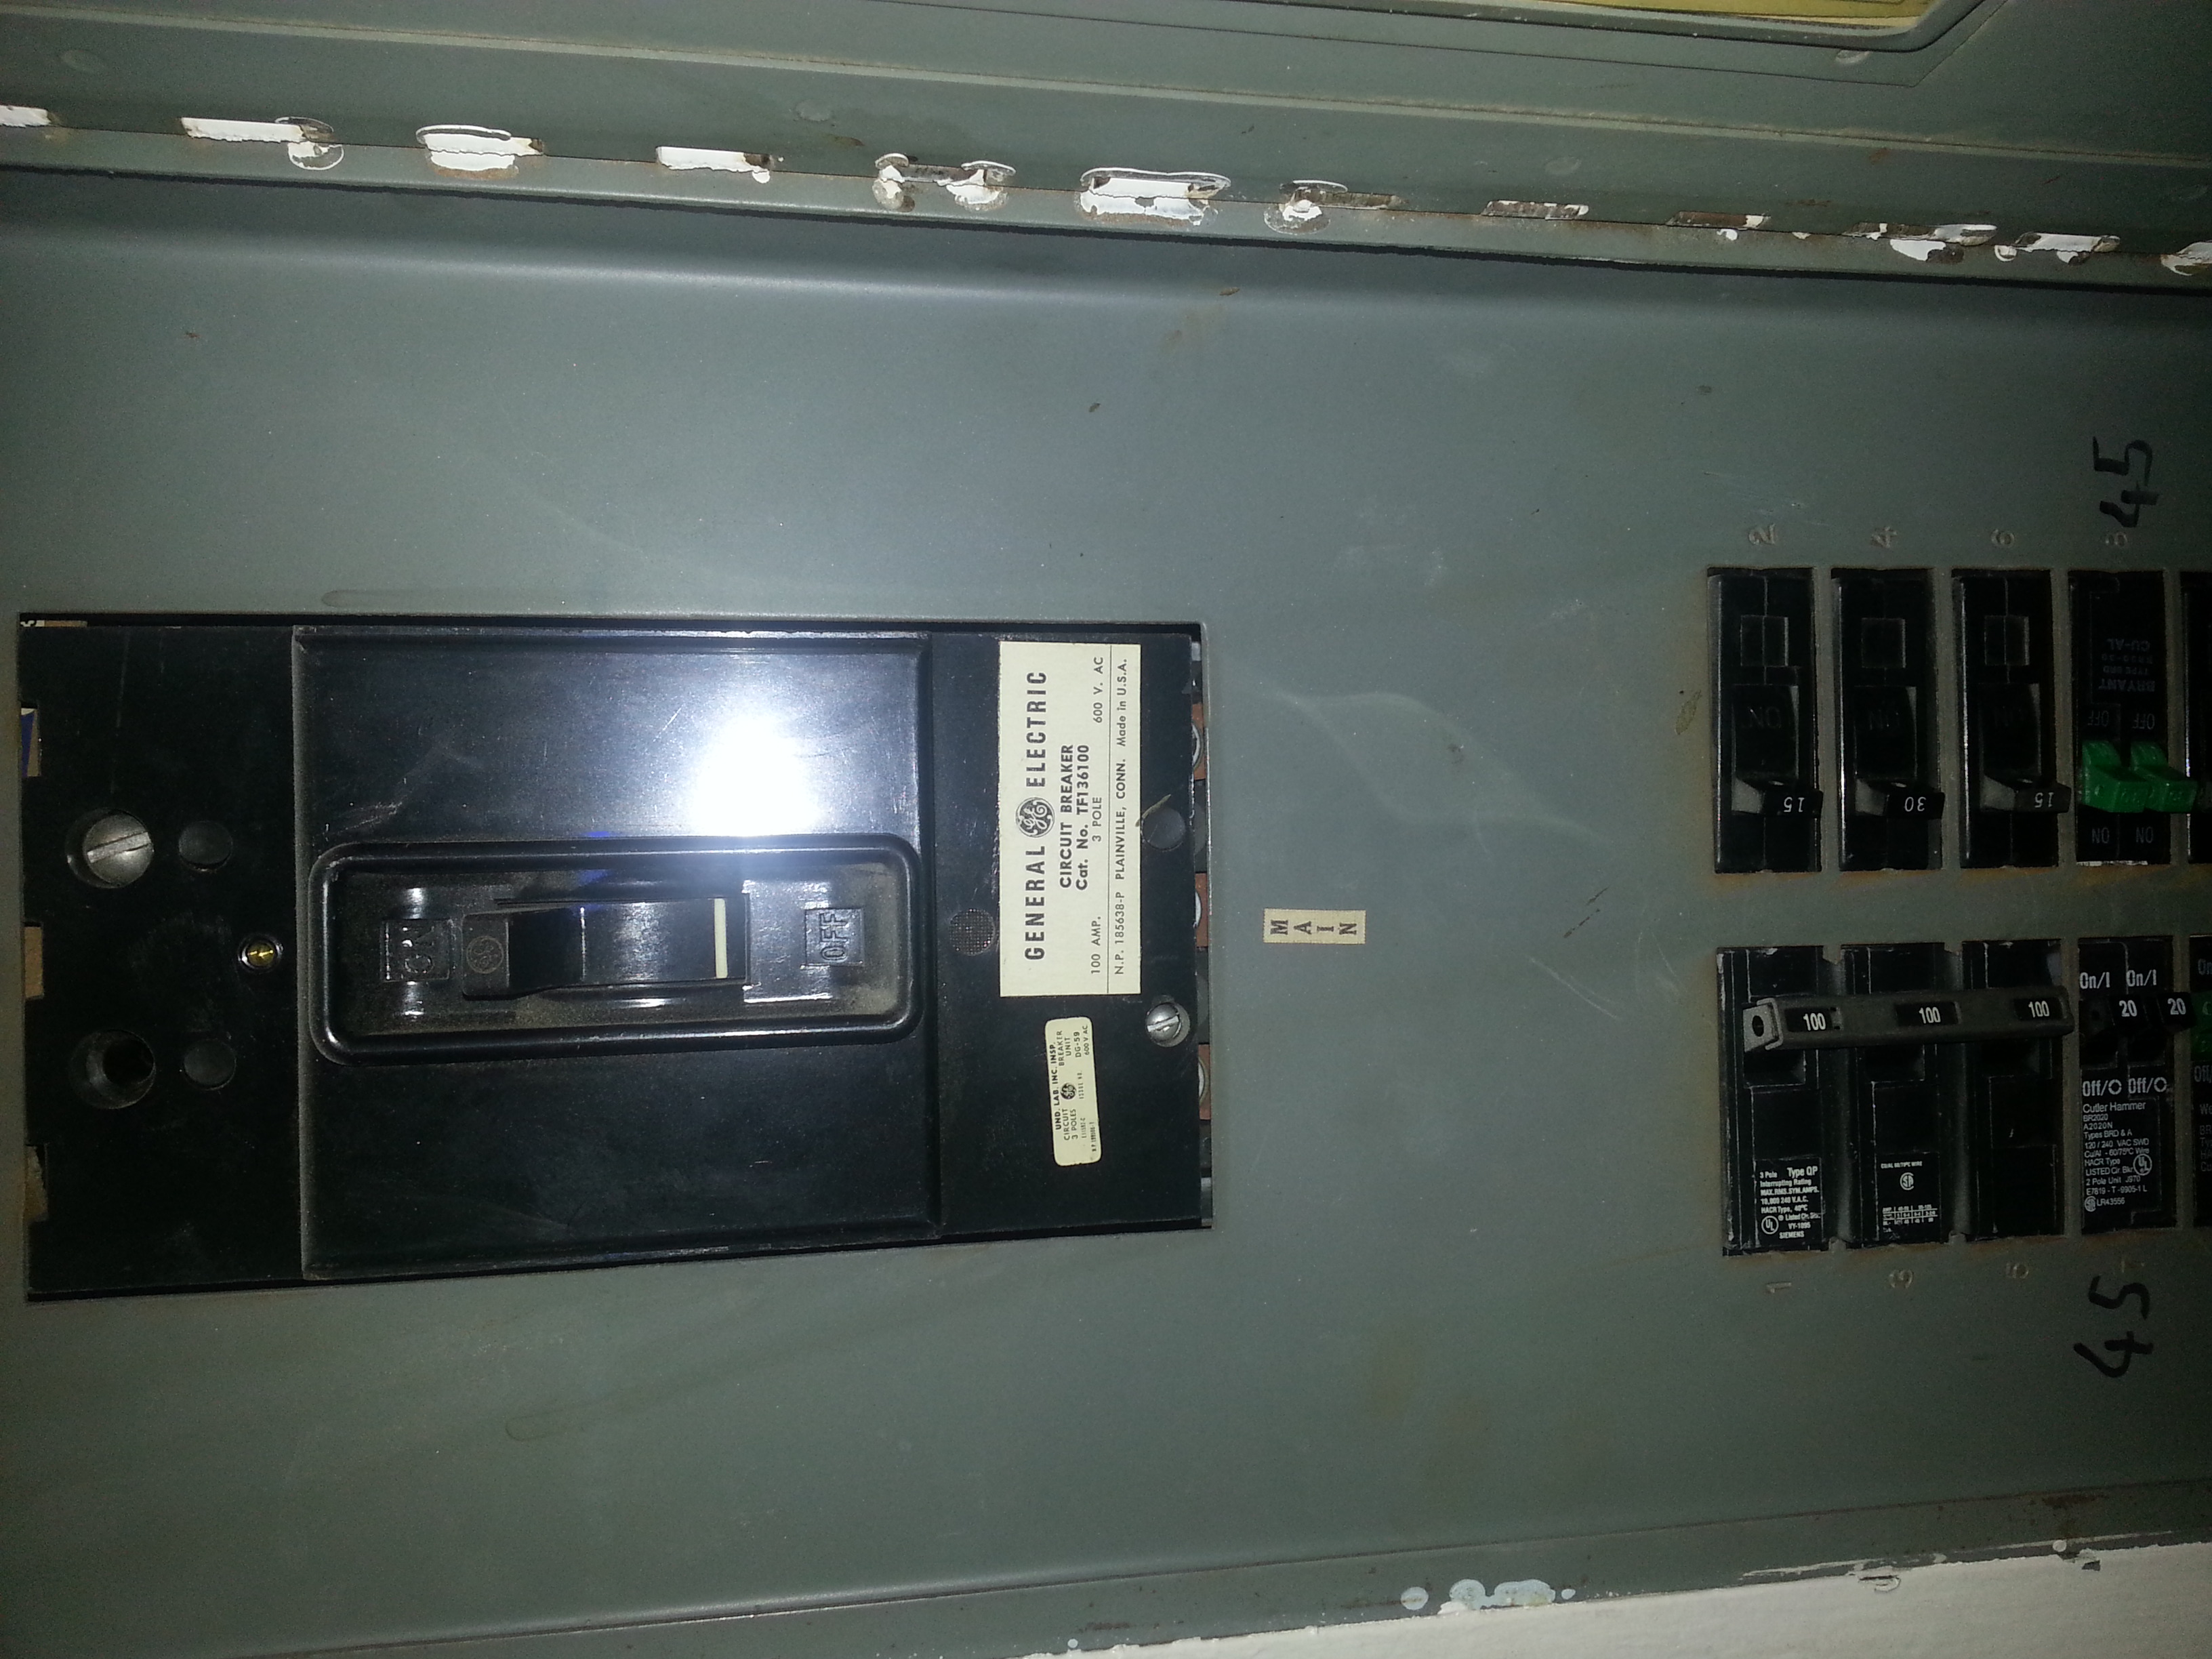
Most of the outlets in 1145 are numbered, corresponding to the circuit breaker. We have images of some of the circuit breaker box (
here and
here).
7A and 7B are on a 20 A breaker at 120 V.
8A and 8B are on a 30 A breaker at 120 V. CAUTION: The outlet, and perhaps wires (!) appears to be rated for 20 A, so DO NOT overload this, because it may not trip the breaker!
16 is on a 20A breaker at 120 V.
1/3 is 30 A at 208V.
We spoke to Bobby, who said that in general the outlets above lab benches are almost definitely separate from those next to wall outlets, and the circuits in the two rooms are separate. In 1147, the outlet near the door to the hallway and the outlet near the door to 1145 (wall outlets) are probably on the same circuit.
Here is a helpful website regarding how much power a computer needs: http://www.extreme.outervision.com/PSUEngine
Its numbers are in “expected power”; measured wattage is in the next column over.
Case |
expected power |
max measured power |
|
|---|---|---|---|
|
|
|
|
Our single-core 3930s |
180 W |
246 W (2.05 A @ 120 ! ) (with overclocking: 4.35 A!) |
|
|
|
|
|
|
|
||
|
|
||
|
|
Current as of 7 Jul 2014:
Type |
Num |
Power (W) |
7A |
7B |
8A |
8B |
16 |
1/3 |
2/4 |
6/8 |
1147: lab1 |
1147: lab2 |
|---|---|---|---|---|---|---|---|---|---|---|---|---|
3770(K) |
44 |
106 |
9 |
12+3 |
8 |
12 |
uws,queens |
|||||
3930 |
2 |
246 |
2(768) |
|||||||||
2670v2x2 |
17 |
312 |
15 |
2 |
||||||||
2690v2x2 |
1 |
417 |
1 |
|||||||||
AC unit |
3 |
1250 |
1 |
1 |
1 |
|||||||
Ind. fan |
1 |
288 |
1 |
|||||||||
Switch, m |
1 |
156 |
1 |
|||||||||
Switch, um |
3 |
72 |
1 |
2 |
||||||||
Router |
1 |
72 |
1 |
|||||||||
Other |
GC |
monitors+ |
||||||||||
Total |
1538 |
1250 |
1794 |
1746 |
144+ |
4680 |
1961 |
1272 |
1250 |
|||
75% Capac. |
1800 |
1800 |
1800 |
1800 |
1800 |
4680 |
3120 |
3120 |
1350 ? |
1350 ? |
||
100% Capac. |
2400 |
2400 |
2400 |
2400 |
2400 |
6240 |
3328 |
3328 |
1350 ? |
1350 ? |
||
Max current |
20 |
20 |
20! |
20! |
20 |
30 |
20(16) |
20(16) |
15? |
15? |
||
Voltage |
120 |
120 |
120 |
120 |
120 |
208 |
208 |
208 |
120 |
120 |
Boomerang with MPI
Recommendations:
On dual:
ncores |
npar=1 |
npar=2 |
npar=4 |
npar=5 |
10 |
20 |
10 |
62.40 |
62.11 |
62.08 |
|||
20 |
44.59 |
38.77 |
40.11 |
42.06 |
64.28 |
It looks like you can pack it better if you do -n 10 NPAR=5 or 10, but you may want fast with -n 20 NPAR=4.
Average time for multiple concurrent runs
ncores |
npar |
ninst=1 |
ninst=2 |
ninst=3 |
ninst=4 |
10 |
5 |
62.14 |
107 |
120 |
152 |
20 |
4 |
38.51 |
71.5 |
190 |
So if you want to get 12 jobs done, your best options are
ncores=10,npar=5,ninst=4,nruns=3 |
3*152=456 |
ncores=10,npar=5,ninst=3,nruns=4 |
480 |
ncores=10,npar=5,ninst=2,nruns=6 |
642 |
ncores=10,npar=5,ninst=1,nruns=12 |
746 |
ncores=20,npar=4,ninst=3,nruns=4 |
760 |
ncores=20,npar=4,ninst=2,nruns=6 |
429 |
ncores=20,npar=4,ninst=1,nruns=12 |
462.12 |
Therefore, I recommend using echo “NPAR=4” >> INCAR mpirun -n 20 ./vaspexe.XXXX
and boomerang should account for the hyperthreading ability.
PDU (powerstrip)
Log in on the web at 192.168.0.110. username and password are localadmin/localadmin. It needs Java to run. You may need to add a security exception to Java to allow it to run.
Or log in via serial console, once you hook up the serial port on a computer to the port labeled “config” on the PDU. (You need a converter.)
Then run:
sudo apt-get install minicom
minicom -s
Settings are 9600 BPS, 8N1, no flow control.
- Make sure you get the right tty; usually /dev/ttyS1::
grep tty /var/log/dmesg
If the power strip is running, press the recessed reset button (right next to the config port).
Default root password is TrippLite.
Managed Switch (pennstation)
Username and password for the switch (pennstation) is available in the documentation repository, under linux/pennstation_password.
It runs FTOS. This is an OS that is not straightforward to learn. Documentation is available (with lots of bookmarks!) is available:
Or get it from http://www.force10networks.com. For this website, Username is marianetti; contact Mordechai for the password.
To log in via serial console (hardware is set up for bruckner):
Attach the appropriate converter (to ethernet) to the SERIAL port on a machine
Connect an ethernet cable between that converter and the jack labeled “console” on the switch
Log in with minicom:
sudo minicom -sCheck your settings in
Serial port setup: Rate 9600, 8N1, no flow controlMake sure you get the right tty; usually /dev/ttyS1; check here:
grep tty /var/log/dmesgSelect
Exitto exit the configuration and enter the console
The command-line interface (CLI) can be confusing. If you don’t know what to do, try tab completion, or, when there is more than one option, the question mark gives you the options:
>?
>terminal ?
>hostname ?
To get through different options, you may need to access the following modes:
Root user (EXEC mode; prompt is now
#); see above for password info:>enable #Configuration (prompt is now
(conf)#):#conf (conf)#In conf mode, prefix “do” to perform an action as if it is in exec mode
Interface:
#interface; type#show ip interface brief“ for a summary of interfaces, and some examples:#show ip interface brief (conf)#interface vlan 2 (conf)#int r gi 0/1 - 48
Some brief how-to tips:
Update FTOS: It came updated
Upload MAC / IP table (DHCP reservation): It is NOT p. 318 “Create Manual Binding Entries”. Instead, we need to make a DHCP pool. Here are the commands:
# conf
# ip dhcp server
# show conf
# pool grandcentral
# host 192.168.0.100
# hardware-address a4:ba:db:03:17:d9
# default-router 192.168.0.1
# dns-server 128.59.1.3
# show conf
# exit
Then on the server, do (as root, where ethN is the appropriate result from ifconfig):
# dhclient -r
# dhclient
# ifdown ethN
# ifup ethN
# ifconfig
Edit MAC / IP table: If you did manual binding (don’t), remove the binding with DHCP clear commands (p. 320). If you did the pool (like above), then you need to remove the pool:
# conf
# ip dhcp server
# no pool erroneous-name
Set up port forwarding: Not possible (this is not Port Monitoring, which is physical ports / ethernet jacks). This is a switch, not a router.
Track usage of each IP at a given time (to see who’s throttling us): View Basic Interface Information (p. 416) to sort by physical port;
See which machines are actually connected at a given time:
# show ip dhcp binding
# ping 192.168.0.100
# show ip dhcp server statistics
remote login with telnet / ssh (see above for username/password):
$ ssh admin@192.168.0.2Set up hostname, username, and password if necessary (see above for username/password). Commands to set up:
# username admin password PWDGOESHERE privilege 15
# enable password PWDGOESHERE  # I think this is to log in
logs
show / save configuration file : VERY IMPORTANT, every time you change something
# show config
# copy run start
VLAN: Technically VLAN2 is enabled, but we don’t need another vlan; see below
Network choices
VLAN or flat network:
10.10 and 192.168 are segregated by VLAN for routing. Michael says it’s a big undertaking to go from flat to segregated network bc need re-IP.
Port forwarding vs VPN:
It looks like port forwarding is easier to set up, and I don’t know if we can do ssh through the VPN so easily.
We can set up a linux server for the router (run clearos or the like) and set up IPtables, which won’t have the limit of 32 addresses
DHCP reservation vs. static IP
DHCP reservation means the router assigns IP addresses but knows to reserve particular ones for particular MAC addresses. Static IP means the node requests the IP address.
http://www.reddit.com/r/sysadmin/comments/156pbh/static_ips_or_dhcp_reservations/
http://anselome.hubpages.com/hub/The-difference-between-static-and-dynamic-IP-addresses
Options:
- Set up a static IP address on each node, and do away with the reservation table (i.e. the node requests its IP address; the power strip does this now).
Advantages: (i) It’s easy to configure (ii) reconnection can be a bit faster (iii) If we get a new router or switch, we don’t have to put in a new DHCP table Disadvantages: (i) You have to make sure you’re not repeating IPs (a DHCP exclusion table + documentation of each IP taken) (ii) If we get a new router with new network parameters, the settings have to be changed manually on each node (iii) You have to set it up individually on each node
Keep the DHCP table on the router
Set up the DHCP table on the switch ourselves: See above